Wednesday, 29 March 2017

Privacy screen in a modern kitchen diner

There's a theory that 'proper' stained glass - leaded panels in a frame - are old fashioned, or only belong in old houses.

This photo shows a privacy screen with the sun coming through it in our house in King's Reach, Biggleswade - built just four years ago.

The zinc-framed panel rests on the sash lifts a uPVC sealed unit lower sash, secured with cable ties.


The panel works well with the black glass table, and the roller blind (covering the top half of the sash window) completes the effect.

Monday, 6 February 2017

Checking and basic maintenance of leaded panels


Leaded panels need occasional maintenance (as does everything, of course ... despite what salesmen will tell you, uPVC sealed unit windows require maintenance and have a finite life, which is much shorter than the 100+ years a properly fitted leaded panel will last!). If this very occasional maintenance is carried out leaded panels will last a very, very long time indeed, and will be watertight, and will withstand anything the weather can throw at them; they'll also cope with a small amount of building movement far better than a rigid single pane (or aforesaid uPVC windows!).

I recently looked at these panels in a church porch:


The first thing to note is that, from a distance, they look to be in good condition, and there are two saddle bars supporting each panel. So long as the fixings are sound there should be little movement in the panel, so the next step is to check for this by gently pressing on the middle of the panel. 


In this case only a small amount of movement was perceptible. (If there had been more than about an eighth of an inch - 3mm - it would show that the seal between the cement and the glass had failed completely, which would allow water ingress, and would only get worse when movement is forced in a strong wind, or due to traffic vibration.)

The next step to check the condition of the cement is to tap many of the lights (glass pieces) and listen to the sound produced: if it is a single 'tap', that indicates that the panel is sound, all pieces being firmly held together, but if there is a rattle, it indicates something is loose and needs to be made secure. (This holds true for ordinary windows, including double glazed units, too.)


One panel in the church porch produced a slight rattle, but the others were all sound. A close inspection of the 'rattly' panel showed some cement to be loose, 


and also that several of the soldered joints in the panel had failed. 


I suspect that someone had leaned on the panel from inside the porch at some point in the past: a short term fix for this panel would be to apply fresh leaded light cement to all of the leads, which will help to keep the rain out and prevent further deterioration of the building fabric. Such a fix could be done by a DIY-er and would probably last maybe ten years, since the saddle bars are holding the panel firm; long term the panel needs some soldering which may involve it being removed from the building, but that can be planned for a time when other maintenance is being carried out.

Inspecting the panels on the other side of the porch I found one broken light - a small hole, almost too small to be the result of wanton vandalism. The glass was firmly retained in the leads, and there was no need to replace it immediately. (To replace it would involve damaging the leads to such an extent that the repaired panel would look no better than it does now; a better solution could be to use clear epoxy to glue a piece of plain glass on the inside of the broken light to keep the rain out, if needed). In the very short term a piece of sellotape can be used to cover the hole just to keep wind and rain out.


Structurally, the panels were quite sound - I was quite surprised, bearing in mind they were installed in 1937 and have probably received no maintenance since then. The leads were showing some sign of corrosion - as with roof flashing, lead in windows will oxidise over time, developing a white surface. To slow down the process boiled linseed oil can be applied to the leads; the right hand side of the panel below has been treated in this way:


In addition, linseed oil applied maybe once every ten years helps to stop the cement losing adhesion on the glass, thus prolonging the life of the panel.

Much of the above can be done by householders or building owners themselves and does not require any specialised skills. 

Thursday, 19 January 2017

How leaded glass breaks when damaged


There's a bit of a paradox about stained glass and leaded windows being fragile. 

The glass is, but the lead absorbs impacts rather well, and a leaded panel in a door will not shatter in the same way a single piece of glass (or even a double glazed panel) might.

I remember encountering one panel on a house in a less than glamorous part of Leeds that had had half a housebrick lobbed at it from a passing car: two pieces of glass were cracked, one (about one inch by three) was broken with a hole in it, and the lead was bent. A short term repair was effected with a couple of pieces of sellotape, and the final repair cost under £100. Another door in the same terrace had a single glass sheet pane, which, when similarly damaged by youngsters, cost more than twice that to replace. 

This single sample piece has been accidentally dropped, and illustrates what happens very well:


- the lead keeps the glass in place and actually absorbs some of the impact, the glass being retained by the lead and cement. (If the cement is old and crumbly it won't be retained as well: this is a good reason to make sure panels are recemented when necessary). If the visual impact of the cracks are not a problem there may be no need to replace a piece damaged like this.


Tuesday, 20 December 2016

Marking dark glass

I like to use strong colours in my work, such as black, dark blue, crimson and dark green to contrast with lighter colours or clear glass.

Way back on my NVQ course we were told to use permanent markers on glass, and I've never really thought much about it, coping with dark glass as best I could and then forgetting about the problems with it until faced with another piece of dark glass on the bench that has to be cut to shape. I've generally used a black 'Sharpie' pen to mark up glass, which are easily obtainable and leave a permanent line, but I've found it very difficult to see the line on some darker coloured glass.

I took an offcut of Wissmach Midnight Blue English Muffle into our local stationers - Howells of Biggleswade - earlier this week, and tried a couple of pens.

I found that ballpoint gel pens (available in gold, silver or white) work quite well - certainly clearly enough to see the line to cut, and the line left by the gold pen is narrower (perhaps 0.2mm) than that left by a slightly worn Sharpie (which could be upwards of 0.5mm). The gold line may not be quite so permanent as that left by a Sharpie but it's more than adequate for the temporary marking needed to cut a single piece.

The gold line stands out much better than the black on red water glass (the black line can just be seen, to the left of the gold one):


I think the gold gel pen cost £1.49 so didn't break the bank, and the shelf over my workbench now has one ready for when I need to mark some dark glass.

Monday, 14 November 2016

Winter offer

I was at the craft fair at The Weatherley Centre in Biggleswade yesterday, and had a number of queries about the care and maintenance of stained glass and leaded windows. During the winter months (November to March) I'll have time to give free advice to any householder or business in the Biggleswade area regarding the condition of their panels, and how best to clean and maintain them.

Key points that people seem to be unclear about seem to be:

  • Basic cleaning and polishing
  • Impact of ageing on lead, how to spot it, and how to slow it
  • Importance of cement in a panel and how it ages


Wednesday, 26 October 2016

My way of making Christmas Puddings


My grandmother used to make puddings for Christmas in February; I think that gave her time to add plenty of brandy!

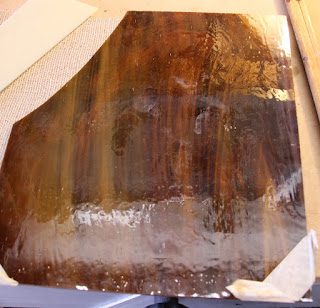
I've a couple of craft fairs lined up for the next month or so and I thought of her when I was going through my offcuts shelf recently, for I found a piece of brown/multi colour (fairly) opaque glass that I think I used to represent stone on my image of Bingley church:


I got to thinking whether I could make up some passable Christmas Pudding suncatchers (or tree decorations). I had several offcuts of opaque white to represent sauce (or icing); after playing with a cardboard template for a while I cut out a couple of samples and edged them in copper foil.


Rather than edge the brown glass to mate with the white in a single plane, I've chosen to plate the white over the brown disc. One sample has copper edging all round; on the other I've just edged those edges I'm going to solder - the appearance of the final piece, without a solder edge between the white and brown, may be better than that with, at the possible expense of strength - I'm not sure how well the piece without the supportive soldering will hold together.

I tinned these pieces using my 80w iron (itself tinned using multicore solder - it seems to be more effective for tinning irons than normal 60/40 solder and separate flux). I use plumbers flux paste, so, after tinning, the pieces were washed thoroughly, dried lightly with a towel, and despatched to the airing cupboard to dry off thoroughly.


Note to the unwary: failing to dry off all water after washing and before the next step (more soldering) will, very quickly, teach you why you should wear safety glasses when soldering!

Once dry, I soldered the pieces together and added a 4mm diameter loop of 0.4mm silvered copper wire, bought from a craft stall at Hitchin market. I also found some plastic decorative holly, meant for cake decoration - the only challenge with that was how to fix it to the puddings.


I ended up soldering another length of 0.4mm wire beside the loop, trimmed the holly and made a hole with a hot needle, and secured the sprig to the pudding by threading the wire hrough the hile and around the berries.

The one without the bottom run of solder (left above) is as solid as the other one; so long as it isn't biffed too much, or allowed to get too wet, it should hold together fine.

I did also experiment with adhesives (epoxy resin and UHU) to secure the holly to the glass but neither stuck well to the flexible plastic holly; both puddings therefore have been decorated using the soldered-wire-through-the-hole fashion, and are ready for the punters at the craft fair in Biggleswade on November 13th, and I've enough materials to make another eight by then (not all in the brown colour though) !


Thursday, 20 October 2016

Panel with lettering

One recent commission was a present for a ruby wedding anniversary. Made mostly from red water glass, it features initials cut from glass, and the dates applied with Letraset.


I used lettering designs from a book, but found that the 'D' was wider than the 'P'; having checked with an expert on fonts and design I revised them to be have the same width.

The panel is made using copper foil, rather than lead came - this is often more suited to detailed work, but does involve a lot of soldering.

I included loops at the top corners; nylon cord was used to hang it for the photo, but the plan is to use a silver or chrome plated chain for it in the long term.

The red water glass has a rather interesting effect - note the distortion of the street lamp behind the panel in the photo!